Sunday, June 30, 2013

Florida - Update #1 - Traveling with Toddler

Road Trip Part 1

We love to travel, and we travel a lot. In fact, our 2 year old has already visited 11 states and 2 countries! I have gotten pretty good at planning what to pack and how to break up trips to keep M the happy toddler she normally is even when we're travelling.

The first piece of advice- consider the drive or flight to be part of your vacation. We have flown all the way across the country, from South Carolina to Washington, and I tried to do everything I could to make the travel day fun (explore the airport, watch airplanes landing and taking off, have plenty of small toys, snacks, etc.) When driving, we have more control over when and where we will stop, and we are taking full advantage of that.

The second piece of advice- if your toddler is potty training (or recently potty trained), make sure to take a potty seat with you in the car! My mom suggested this, and I am so glad we listened. It saved us on more than one occasion. 

We woke up at our normal time on Saturday morning- no need to start with a cranky, tired toddler! We ate breakfast, dropped the dogs at the vet, and were on the road by 10:30. We planned to stop to have lunch with family in Columbia, which is about 2 hours from us. This was the perfect stop- we got to see family, eat, stretch our legs, use clean restrooms... and M got to have a mini-dance party!


After a nice lunch break, we got back on the road for Savannah, Georgia, which would be our final stop for the day. We set M up with her "friends" (aka stuffed animals) and some music in the backseat and she was asleep in no time. We had about 3 hours to go, and M slept for a little over an hour of the drive.


Unfortunately it rained for a good portion of the second leg of our trip, so we weren't able to get out and stretch our legs much. We still stopped off for some Dunkin Donuts, and pulled out some crayons and paper on a clipboard to keep M busy for the rest of the trip.


We had some leftover hotel points, so we booked a room at Andaz Savannah. It was right downtown near the river. We were greeted by the concierge who checked us in on an iPad and gave us complementary glasses of wine - off to a good start! They also have free snacks and non-alcoholic beverages in the mini-fridge in the room!


After dropping our bags in the room, we headed out to meet my parents for dinner. We took a stroll along the river, watched the boats sail under the bridge, and even made a touristy stretched penny! We ate dinner at Dockside Seafood, which was ok. It was late and we were all tired from our first day of travel, so we headed back to the hotel for bed.


Road Trip Part 2

We got up the next morning, packed our bags and checked out of the hotel. We left our bags in the car while we walked a few blocks away to eat breakfast at J. Christopher's, which was recommended to us by the hotel concierge. The food was very good, and M thoroughly enjoyed her "Peter Pan-cakes" (blueberry pancakes with brown sugar and crunchy granola on top).


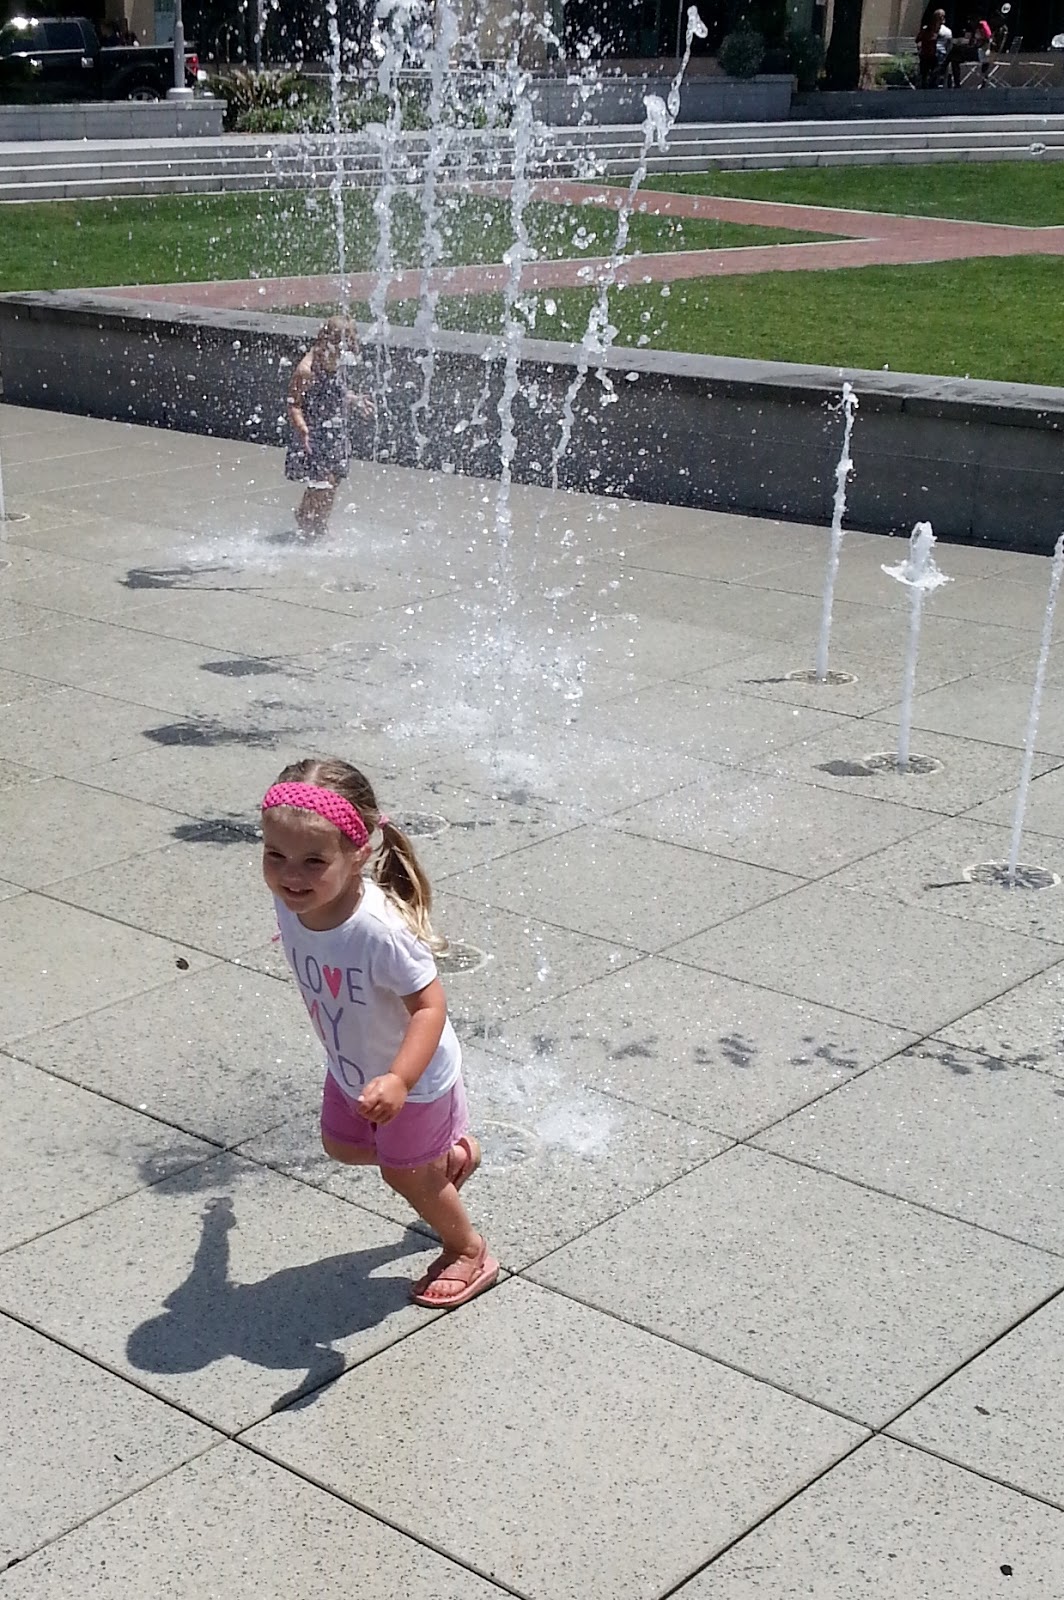
After breakfast we walked back toward the hotel where our car was parked. There were some fountains in the middle of the square, so we decided to let M run off some energy before we started the second half of our journey.

She had a lot of fun, and it was worth the mess to give her some time to run around before confining her to the car for 4 1/2 hours. We left when she got tired, and she slept for the first couple hours of our drive.


We packed plenty of snacks, so we skipped lunch (it was raining again at this point) to save some time. M played with her princess magnet set and colored for the remainder of the trip. When we reached our hotel (Marriott's Harbor Lake) we explored, ate dinner, and prepared for our first big day at the parks - Magic Kingdom!

Toddler takes Florida!

Vacation!

This week we are headed to Florida for M's first trip to Orlando! This is our first attempt at a Disney/Universal trip with a toddler, so I'm no expert, but I'll update thought the week with our successes and failures. Here's our plan:

Saturday- drive from South Carolina to Savannah, Georgia

Sunday- drive from Georgia to Orlando, Florida

Monday- Magic Kingdom

Tuesday- Animal Kingdom

Wednesday- break/pool day

Thursday- Universal Studios

Friday- Universal Islands of Adventure

Saturday- repeat favorite Universal rides (Universal currently has a "buy 2 get 1 day free" promotion)

Water Week - Update #5

Friday

Today was another low key day. We were getting ready for vacation, cleaning the house, doing laundry, and starting to pack. There was just one more activity I really wanted to try.

Water Xylophone

M has an app on my phone with a xylophone (she calls "duck piano," but the app is actually called "Kids Piano Lite"), so I thought she'd really enjoy a water xylophone to play with. We added a little extra to the activity by making number and alphabet shaped ice cubes with food coloring the night before. I got the silicone trays on clearance at Hobby Lobby a few months ago. We made all 4 trays, one blue, one red, one yellow, and one green.


After lining up 6 glasses, we started dropping the ice cubes into the glasses in rainbow order. As we took the letter ice cubes out of the trays we named the letter and made the letter sounds. 


We didn't have orange or purple ice cubes, so we talked about how we could mix colors to make those.


Now the hard part- wait for the ice cubes to melt. You could very easily add some warm water to each cup (or do this outside on a hot day), but we decided to let them sit and come back later. It was cool to see how much M is leaning- I told her we needed to wait for the ice to melt, and she said "so it will turn into water?"
When we came back later, we added more water to the glasses so the red glass had the least and the purple glass was full.

 I gave her a striker from her marching band set (a spoon would work just as well), and let her explore the different sounds. We talked about the difference between high notes and low notes and how they can be combined to make songs. I explained why the glasses made different sounds. (Adding more water increases the mass, which lowers the frequency of the sound wave, and we hear a lower note.)


M had a lot of fun with this, and I'm sure we'll do it again when she's older and can learn more about sound waves, pitch, frequency and amplitude. You can find more activities here --> Math, Science and Sound Activities

Water Fun with Friends

After lunch we went to a friend's house (who happened to be playing along with our water theme for the week!). They set up several tubs of water with toys to explore. There were 6 kids total, including some little crawlers and some older toddlers. There was something for everyone- boats, water guns, water beads, stones, magic capsules that dissolve and release foam animals...

I will definitely buy some of those water beads to use again. The clear beads disappear when you drop them in water, and you can feel around in the water to find them. They come in different colors too, which could be fun for sensory bins.

Overall, I'd call Water Week a big success! Next up- Vacation!

Friday, June 28, 2013

Water Week - Update #4

Thursday

Flubber!

As a teacher, I made Flubber with my Physical Science students when we studied polymers. The kids always enjoyed it, and it brought up some great conversations about the properties of materials. My plan for today was to help M make a batch, then give her some "props" to create a mini ocean scene. She clearly had other plans.

First, she wasn't interested at all in helping to make the Flubber. To be honest, she wasn't interested in doing much of anything this morning - it was just one of those lazy days I guess. So she sat on the couch in her pajamas and princess skirt and watched an episode of Doc McStuffins while I whipped up some Flubber.
 

I started by mixing about a cup of Elmer's Glue with about 3/4 cup of water and some blue food coloring. It takes quite a bit of glue (two full 4 oz bottles). When we did this at school, we would buy the giant containers of white glue, but Elmer's brand seems to work a little better. I cleaned out four half-empty bottles of glue, and coaxing the glue out of the bottle and into the bowl was definitely the hardest part of this whole "experiment."

I used a small rubber spatula to mix the water and food coloring into the glue.


Next, mix a teaspoon of Borax into 1/2 cup of hot water. Mix it until the Borax is completely dissolved.


At this point, I transferred the Borax solution into the container I planned to use to store the Flubber. I have read that Flubber can be stored indefinitely in an airtight container in the refrigerator. I haven't tested it (yet), but we'll see.


Finally, I poured the glue mixture into the container with the Borax solution. This part was really cool because the glue immediately reacts with the Borax and form clumps that seem to grow. Continue to pour the rest of the glue mixture into the container, and use the spatula to get as much glue into the mixture as possible. Stir the mixture (or use your hands) until most of the liquid has been absorbed. There will probably be some water remaining that you can pour off into the sink. The final material should feel slimy, but should not stick to your hands.


Flubber is neat because it is a synthetic polymer and has properties that make it different from most materials we are used to. When you hold the Flubber in your hands, it will spread out and seem to flow like a thick, viscous liquid (like honey). When it's pulled quickly, it will snap apart, more like a solid. If you push on it with your hands, it feels hard, but if you let it sit it will spread and appear to "melt" into a puddle.


This may have been M's favorite activity of the week (once I pulled her away from the couch). She's not a huge fan of getting her fingers sticky or messy, so she immediately handed it back to me when I gave it to her. When I started to show her what it could do, she grabbed it back and spent close to two hours exploring and playing with it.


I gave her a box of materials (sparkly pipe cleaners, shells, straws, smooth rocks, plastic sea creatures, small cups and containers) to create an ocean scene. She tossed the sea creatures and told me she wasn't interested in making an ocean. Instead, she wanted to make an "un-birthday cake" and a couple cups of coffee. I'm not sure where she learned to drink coffee with a straw, but she enjoyed using the straw to poke holes in her coffee.


We found that the Flubber could hold the impression of different materials for a short amount of time, so we made shell and rock prints to compare the shapes and patterns.


 When we were done playing, we packed it all into its container and put it in the refrigerator. She had so much fun that she requested it again when we got home later that evening. She thought it was funny that the Flubber "plopped" out of the container and held its shape (like a can of cranberry sauce!). First she rolled it out like dough and made hand prints, then she stretched it to make a really long "snake" that she draped over her learning tower. She was really proud of her creations.


Library

After our fun with Flubber, we headed to the library to return our books, meet up with some friends, and check out a new set of books for the upcoming weeks. Next week will are taking a trip to Disney World (yay!), and will spend the following ten days at the beach, so we checked out several books about the ocean and marine animals.

Like last week, I did a quick search in the online catalog to find a list of books about the ocean before we got to the library so it would be easier and faster to find our books. As a bonus, a friend let us try a travelling handwoven wrap (Denim Dreams by Ruck Star Handwovens), so M was able to take a quick ride on my back while I collected all of our books!

M spent some time playing with friends in the children's room while I got a chance to relax and spend some time with other moms. It was another great day!


Thursday, June 27, 2013

Water Week - Update #3

Wednesday

$1 Summer Movies

Regal movie theaters run the Summer Movie Express, which shows $1 kids movies on Tuesday and Wednesday mornings for 9 weeks during the summer. You can find more details here. Today's movie was Alvin and the Chipmunks: Chipwrecked, which was very fitting for our water theme! The movie was adorable, and M loved it. She asked if she could get up and dance several times during the movie, and finally had a "dance party" during the credits. She is hysterical!

Water Experiments

 After the movie, we spent some time doing a few kitchen science activities. First, we explored oil and water. Yesterday we read in one of our library books about how ducks have a coating of oil on their feathers that keeps their feathers dry when they swim. We tested this out by mixing oil and water. We added some food coloring, and talked about why the food coloring didn't mix with the oil (because it is water based), but "exploded" and diffused throughout the water when it got through the layer of oil.


I put M in charge of pouring and adding the food coloring, so we ended up with a VERY dark blue. We dumped out half of the mixture, poured it into a bowl, and expanded the activity to talk about color mixing. M added a few drops of yellow food coloring to turn the water green! This gave us another opportunity to talk about how the food coloring mixed with the water to change its color, but didn't mix with the oil. This was  big hit.


 Next, we washed out the measuring cup and made some new green water. M poured the water into a small mason jar. We added a paper towel "bridge" from the jar with water to another empty jar. We talked about capillary action (she thought that was a pretty funny word) and guessed how long it would take for the water to "climb" up the paper towel.


NOTE: This took quite a bit longer than we guessed. Here's what it looked like after 20 minutes:


After 30 minutes:

 We checked it again at bedtime (about 9 hours later), and the water had started pooling in the second jar. I was impressed. M, not so much. Maybe we'll try it again when she's a little older.


After setting up the capillary action experiment, we moved on to talk about states of matter. We talked about the properties of solids, liquids and gases. M is only 2, so the conversation was very basic.

Solids are hard and have a definite shape (we can make ice cubes in different shapes, and when we take them out of the ice cube tray they keep that shape). Water turns into a solid when it is very cold, like when we put it in the freezer.

Liquids flow and take the shape of the container they are in. We can pour water because it is a liquid. We poured it from a jar into a measuring cup and then into a bowl, and each time the water changed shape to fill the container. When ice heats up, it melts and becomes a liquid.

Gases have no shape; they will expand to fill any container. When they aren't in a container they will rise into the air, like the steam that rises out of a pot when we are cooking. Water turns into a gas when it is heated, and we call it steam. When steam cools, it condenses and turns back into a liquid.

We heated up water in a kettle, poured it into a jar, and added food coloring. We observed how quickly the food coloring diffused throughout the water (molecules have more energy and are moving faster). We watched the steam rise, and put a bowl of ice on top of the jar to speed up the condensation. The idea was to make it "rain," but the neck of the jar wasn't wide enough, so the water just dripped down the sides of the jar. It was a little disappointing.


Our last experiment of the day was supposed to simulate how rain falls from a cloud. I found the idea here, and it looked really cute, but didn't work the way I expected it to. We made a shaving cream "cloud" on top of a glass of water. M added food coloring until it "rained" down into the cup. She was very interested in the shaving cream (we later took an entire bowl of shaving cream out to the baby pool to play and explore), but didn't really get the rain part. I'm wondering if this would work better with cotton balls somehow... maybe we'll revisit this when we get into weather.


Chalk Paint Round 2

Yesterday's attempt at chalk paint was a bit of a disaster, but I thought it was such a good idea that I wasn't willing to give up. This time I mixed the cornstarch, food coloring and water myself (while M was busy playing with a bowl of shaving cream in the pool). I added more water this time and got out the foam brushes. This was SO much better! I found that the more watery the solution was, the easier it was to paint with. The foam brushes definitely slid across the pavement much better than the regular paintbrushes too. We got out our foam hopscotch set and used the pieces as stencils to paint numbers all over the driveway. I also painted the alphabet across the driveway, and we stepped on each letter as we sang the ABC's. The only issue we had was that the watery paint was very easy to spill (see the big splash under the letter I). I'm wondering if small cans might work better, like recycled pineapple or tuna cans (and as a bonus, they would look like mini paint cans).