


M's interest in dinosaurs this past summer led us to read some books about meteors. The topic of space kept resurfacing, so I decided it would be fun to take a couple of weeks to explore the solar system. Here's the plan for Week 1:


Practical Life
Balancing PlanetsDiscovery Moments had some great solar system activities. I liked their "balancing planets on golf tees" activity, and so did M and her friends. I stuck the tees in some floral foam because I wanted to leave it out and didn't want the play-doh to dry out. M used her fingers to pick up the marbles and balance them on the tees, but I added a pair of tweezers too in case she was feeling really ambitious.


M got tired of this activity pretty quickly, but turned it into a counting game instead. She was transferring the marbles from hand to hand and from herself to me and counting as she moved them.

Lacing Stars
M is really big on lacing lately, so I thought it would be fun to lace some foam star beads onto glittery pipe cleaners. The friction added a little more challenge, and she liked that the pipe cleaners were sticking up (in balls of play-doh), which is different than the usual lace. My original plan was to try to work on patterns (alternating colors), but M just wanted to lace them on her own. We later added some pony beads as well.


Constellation Poking / Tracing
Teach Beside Me has an easy activity using free printable lacing cards to make a constellation tracing activity. I laminated the cards, then punched holes in them where the dots were (NOTE: some of the dots were too far from the edge and I couldn't reach them with my hole punch, which made this way more challenging than it needed to be. You may want to print smaller cards...).
I created two different activities from these. I put half sheets of black construction paper, and showed M how to make marks with a white colored pencil through the holes on the templates. I helped her connect the dots to draw the constellation. From there she could either add star stickers where the stars would be, or she could put her picture over a piece of scrap cardboard and use a push pin to make holes all along the lines of the constellation (like Our Montessori Home). She liked poking the holes, although the constellation was fairly large and she lost interest before it was finished. I completed it for her after she moved on to another activity, and she did really like seeing the light shine through the finished product when I held it up to the window.


Sensorial
Galaxy Play-dohThis play-doh from Instructables is amazing! I use a slightly different recipe for homemade play-doh (3 c. flour, 1.5 c. salt, 3 Tbsp veg oil, 6 tsp cream of tarter, 3 c. water). After I made the play-doh, I split the dough in half and put half in the fridge for another time. I added black food coloring to the remaining half (I got the thick gel-like food coloring from the baking section that gives a richer color), as well as some silver and blue glitter. The black food coloring had a kind of greenish look at first, so I kept adding more, and probably ended up adding too much because it will stain your fingers a little as you play with the dough. It's totally worth it though - glitter play-doh!

One of M's friends played with it in the morning during our homeschool/preschool co-op. M got it out later that afternoon and we ended up taking out the rest of her regular play-doh so we could make some planets to orbit in space. We even added little play-doh counters to count the planets in order.


What does an alien look like?
When I was teaching, we used to do this activity during the Evolution Unit where we would describe a planet called Jupiteria. The Jupiterians had destroyed their planet, and were forced to split up and go to different planets to look for a new home. They planned to have a reunion many years in the future, and students were asked to construct models of what the aliens might look like after millions of years on their new planets. Teams of students were given different descriptions of planets (some were hot, others were cold, all had varying types of food and predators), and had to write a story explaining the adaptations that were most advantageous to the survivors.
My plan is to give M and her friends a brief description of a few of the planets, then give them toilet paper rolls and a bunch of craft supplies (feathers, pipe cleaners, pom poms, googly eyes, scrap paper, etc) and let them create aliens that live on a different planet.


I gave them pieces of cardboard to decorate to look like the planet so they can put their alien in its home. The kids moved on to other activities after creating their aliens, so I brought out some paints for M after her friends left. We added some cardboard packing material for craters, and she mixed and swirled the colors to look like the pictures of the planets we have looked at.


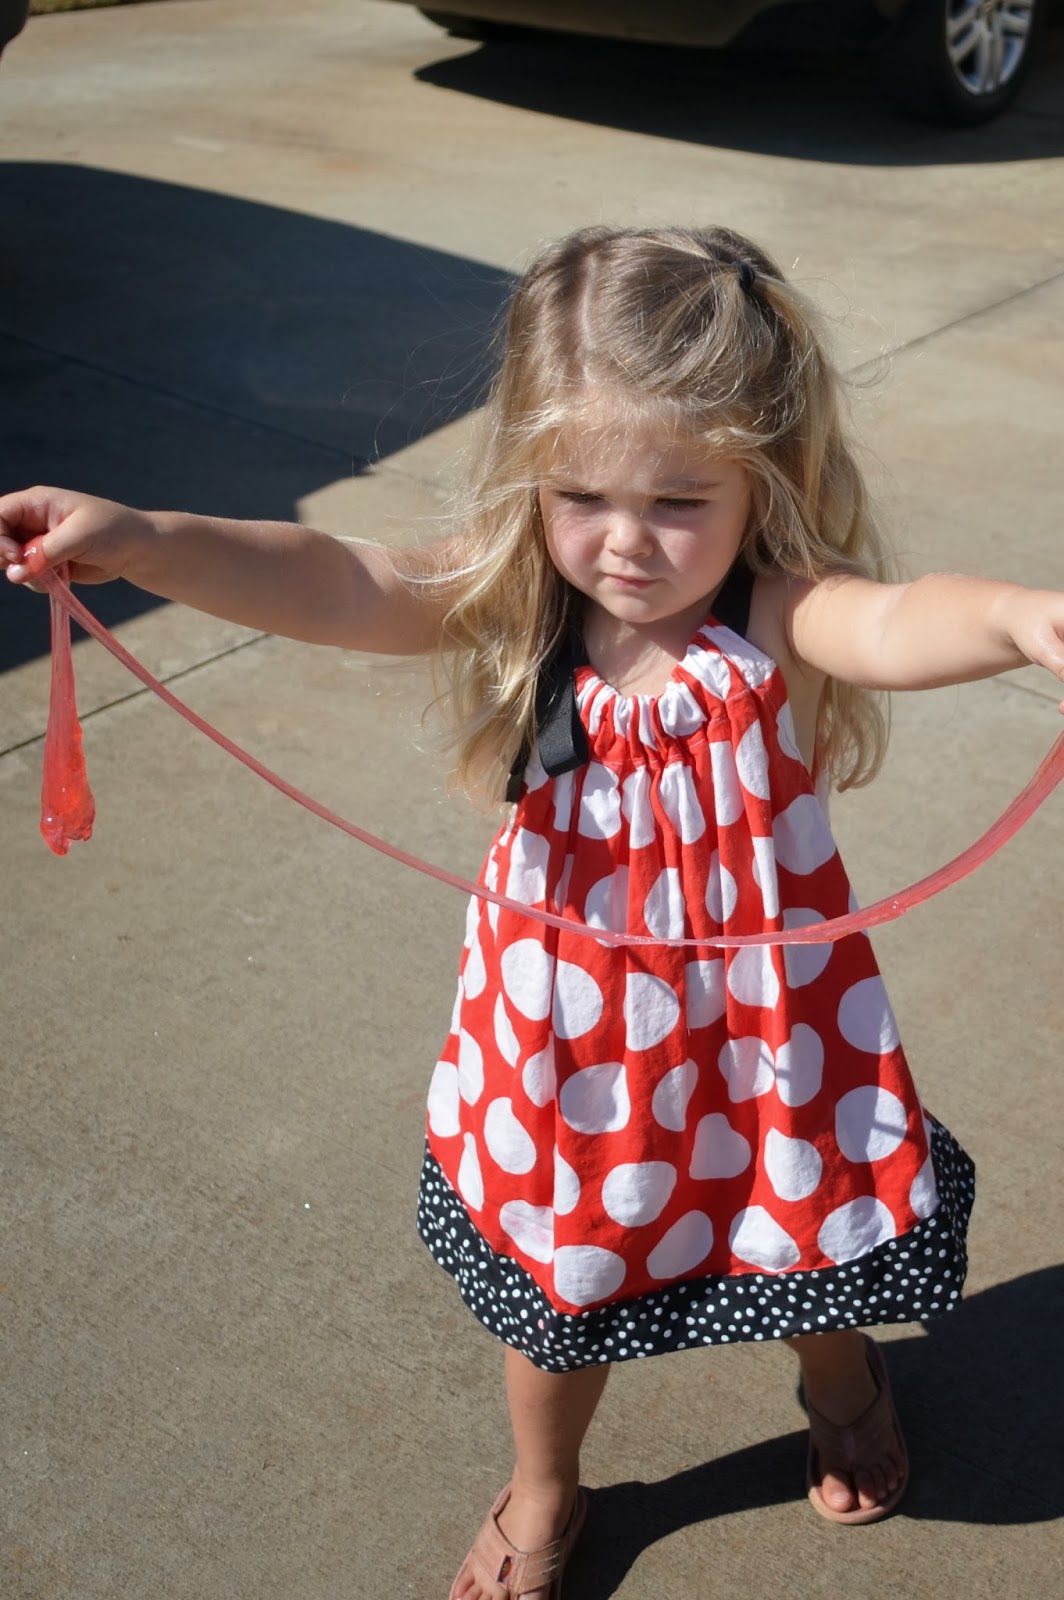
Alien Slime
I found a recipe for slime (The Meta Picture) for the kids to play with. My original idea was to somehow incorporate the slime into the alien planets, but it was a little too "juicy." We took this one outside, and the boys especially had a great time with it. M found it a little too slimy, but she liked it more when she realized it would stretch as she held it (similar to the Flubber we have made in the past).


Painting Planets
M got a neat finger painting set
Language
3 Part Cards - PlanetsI got the free 3 Part Cards from Imagine Our Life. She used the cards with an adorable quiet book that I am not nearly crafty enough to make... We used ours for a mini-lesson at the beginning of our homeschool/preschool co-op. I spread out the felt planets (below) and the cards on the table around a mini felt board. I asked the kids to find the sun, and they helped place the felt piece and the matching card on the board. I named each of the planets in order and described the color of the planet to help the kids find the appropriate felt shape and matching card.

She finally noticed the label cards, and pulled them all out to look at the words. She asked me "What do these letters say?" I read the names of the planets, and she put the labels on the matching felt planet. She was actually able to find most of the planets on the first try!


Felt Planets
The template for the felt planets also came from Imagine Our Life. Her planets are way cuter than mine because she sewed hers and I used glue, but they are functional.

Constellations
I printed this great free Find the Constellation star map and cards from Trillium Montessori. We had a few different constellation activities, so I thought it would be neat to print out some of the legends behind the constellations. I found this great free book of Constellation Legends from The Clemmie Gill School of Science and Conservation. I printed the whole document (33 pages) and put it in a binder, but you could very easily scroll through and print just the stories you are interested in.

Sandpaper Letters / Salt Box - S is for Spaceship
M hasn't been very interested in the sandpaper letters yet, so I'm not pushing this one at all. I did set out the letter s along with her salt box in the space under her small bookshelf. I'm sure she'll let me know when she interested.
Pretend Play - Outer Space
We have been spending a lot of time in M's "clubhouse" lately. For the past few days we have been taking books with us to read while we sit. One of the books about galaxies inspired M to turn her clubhouse into a rocket ship so we could fly to the moon. We talked about how the force of gravity is not as great on the moon, so she had to be careful when she left the spaceship so she wouldn't float away. She also climbed the "craters" (her rock wall). When we went inside later, she used some of her small chairs and her bike to create a rocket ship, and I made her a very rough astronaut's helmet out of a recycled mail envelope.


Mathematics
Size Sorting StarsI bought a pack of glow-in-the-dark stars at Walmart. These were a huge hit! We sat in the bathroom (one of the few spots in the house with no windows) while M excitedly told me over and over "My stars are glowing! Do you see them glowing?!" I left out a few for her to take up to her room, and used the rest for a size sorting activity. There are three different sizes of stars (actually four sizes if you count the one really big star, but that one was in her room). I put them in the middle of a tray and showed M how to sort them by size.

Phases of the Moon Oreos (time)
123 Homeschool4Me has some great free printables to go with this Phases of the Moon with Oreos activity. Granted, I ended up making the phases of the moon while M ate Oreos, but I still think it's pretty awesome. I think she got the general idea that the moon doesn't always look constant and goes through a cycle. It also gave me an opportunity to talk to her about time - day and night, months, seasons, etc. And we NEVER eat Oreos.... so yum!


3-2-1 Blast Off!
I found a fun DIY Rocket activity from My Montessori Journey (I'm not sure why the page is showing up weird, but it's about half way down). I have some thick milkshake straws that I cut and taped onto the back of the rockets (after the kids colored them), and then fit regular drinking straws inside to launch. If you're looking for a real rocket, this is not it, but it was quick and easy for a toddler. M loved hers, and actually insisted on making a second for her daddy when he came home from work. We practiced counting backwards from 10 for launches.


Seasons
It's fall, and we have been talking about how the weather is getting colder, the leaves are changing color and starting to fall, and we're moving into a new season. I had M's interest peaked after a morning of collecting a "rainbow of leaves" for a collage, so after gluing her colored leaves, we sat at the computer and watched a few YouTube videos about why we experience seasons.


This video is quick - less than 4 minutes - and explains how the Earth's axis is tilted, which causes the Northern and Southern hemispheres to receive direct or indirect sunlight depending on Earth's position relative to the sun.
We actually also watched this Bill Nye Seasons video, which is closer to 20 minutes. We watched about 16 minutes or so before M lost interest - pretty impressive for a 3 year old! Like all Bill Nye videos, it is pretty fast paced and doesn't stay on any one experiment or discussion for very long, which definitely helped keep M's attention.
Time
I really like this model from Nurturing the Tender Years that shows how the Earth orbits around the sun and the moon orbits around the Earth. We haven't made this yet, but we plan to make it later in the week to go along with a song about how the Earth rotates once each day and orbits the sun once each year. M doesn't have a great grasp on time yet (she refers to anything in the past as "yesterday"), so I'm trying to pull in some basic ideas about the passage of time.
Science/Cultural Studies
Where do I Live? BookA while back I pinned this great idea from Counting Coconuts for a "Me on the Map" book. We made a slightly different version that is a little more space-themed. I like how they added some information to the back of each page. We may gradually add information like that as M learns more about her world.
I started by finding Google images and copying them into Word in successively smaller circles (the front and back covers are thick collage board that is 8 1/2" diameter). I cut out the circles and laminated them, then punched a hole in the top of each circle. M helped me assemble the "book" by putting the circles in order (our house was on the smallest circle, and the universe was on the largest circle). I connected them all with a binder ring so she could easily flip through the pages. After we looked through the book together several times, she "read" the book to her teddy bear.


Videos about Planets
We have watched several different videos and TV shows about planets and astronauts. Aside from the videos above about seasons, we also watched a video about How Astronauts Put on Space Suits (M thought it was hysterical when they said that astronauts have to wear diapers under their space suits!). Another favorite was this Outer Space: We are the Planets song. I recorded several programs to watch this week - I'm sure we won't watch them all, but so far M really liked the first 30 minutes of "Inside Planet Earth

Planetarium Field Trip
We are fortunate to have a great science center near us that offers a really fun planetarium show. It is very reasonably priced (in fact, it's free for kids under 5), and they do a terrific job. My husband and I attended a show a few years ago because one of my colleagues at the time works at the center. I know that M is really going to enjoy this trip!
Snacks
What do Astronauts Eat?One of the other moms in our co-op found dehydrated ice cream (at Old Navy, of all places!). The kids thought that was pretty cool! She also brought dried fruit. We talked a little about how astronauts can't eat the normal foods that we eat at home.


Planet Pizza
For lunch, we made the solar system in pizza! We started with tortillas, which we cut into shapes with cookie cutters. We used a sunburst for the sun, different sizes of circles for the planets, and a football cookie cutter to make the ring around Saturn.

M added spoonfuls of pizza sauce and covered everything in cheese. We added a little blue food coloring to Earth's cheese so it would be blue. M added decorations on a few of the planets - some green pesto on earth for the land, a piece of pepperoni on Mars to make it red, and strips of pepperoni and pieces of sun dried tomatoes to make the stripes on Jupiter and decorate Saturn.


We popped them in the oven for about 5 minutes (just long enough to melt the cheese). Who knew planets tasted so good!


Disclaimer: This post contains Amazon Affiliate links for your convenience.
Linking Up With:
Montessori Monday